
Saving and Publishing content
Short url: https://ewp.guide/go/be/saving-and-publishing-content
Once you’ve added all your content to your Page or Post you have the option of Saving the Page as a Draft or Publishing the page. Clicking the Save draft link will simply save your Page/Post. This is handy if you would like to come back at a later date to add more content or if you’re simply not ready to publish yet.

If you’d like to see what your Page/Post will look like before you Publish, click the View icon. The View option will provide you with the ability to show the editor in Desktop, Tablet or Mobile view, by reducing the editor width as needed. Clicking the Preview in new tab option will open a preview of the current Page/Post in a new browser tab, allowing you to view the page without the clutter of any of the WordPress menus or Editor toolbars. Out of all the Preview options, previewing your content in a new browser tab will give you the most accurate view of what your Page/Post is going to look like.
Sticky Posts are placed at the top of all blog posts and stay there even after new posts are published. Turn on the ‘Sticky’ option to make the Post ‘Sticky’. This option is only available for Posts. It’s not available for Pages.
You can also change the status & visibility of the Page by clicking the Status link within the Summary panel in the Settings Sidebar.
- Draft is the default status when saving a new Post or Page that hasn’t been Published yet.
- Pending means the draft is waiting for review by an editor prior to publication
- Private hides the content from the public completely. Normal users and visitors will not be aware of private content. You will only see the private content when you are logged into your WordPress blog.
- Scheduled allows you to automatically publish on a chosen date.
- Published is the default status when you simply click the Publish button and publish your content. Published content will be visible to everyone.
- Password Protected content allows you to assign a password to your page. Only people who have the password will be able to access the page.
The Summary panel in the Settings Sidebar also shows the full URL for your Page or Post. You’ll see this URL after saving your content for the first time. Clicking this URL link will open a small popup that allows you to edit the post slug. You might decide to do this for improving SEO (Search Engine Optimisation). Most times though, you’ll simply leave the default URL which WordPress automatically generates based on your Page/Post Title. The popup also shows a link to the Page/Post, which when clicked, will open your content in a new browser tab.
By default, when you publish a Page/Post your content is published immediately. To change this, click the link just to the right of Publish within the Summary panel. You can then select the date and time that you’d like to schedule your Page/Post to be published. After setting a date & time to publish, you must still click the Publish button to publish at the desired date and time.
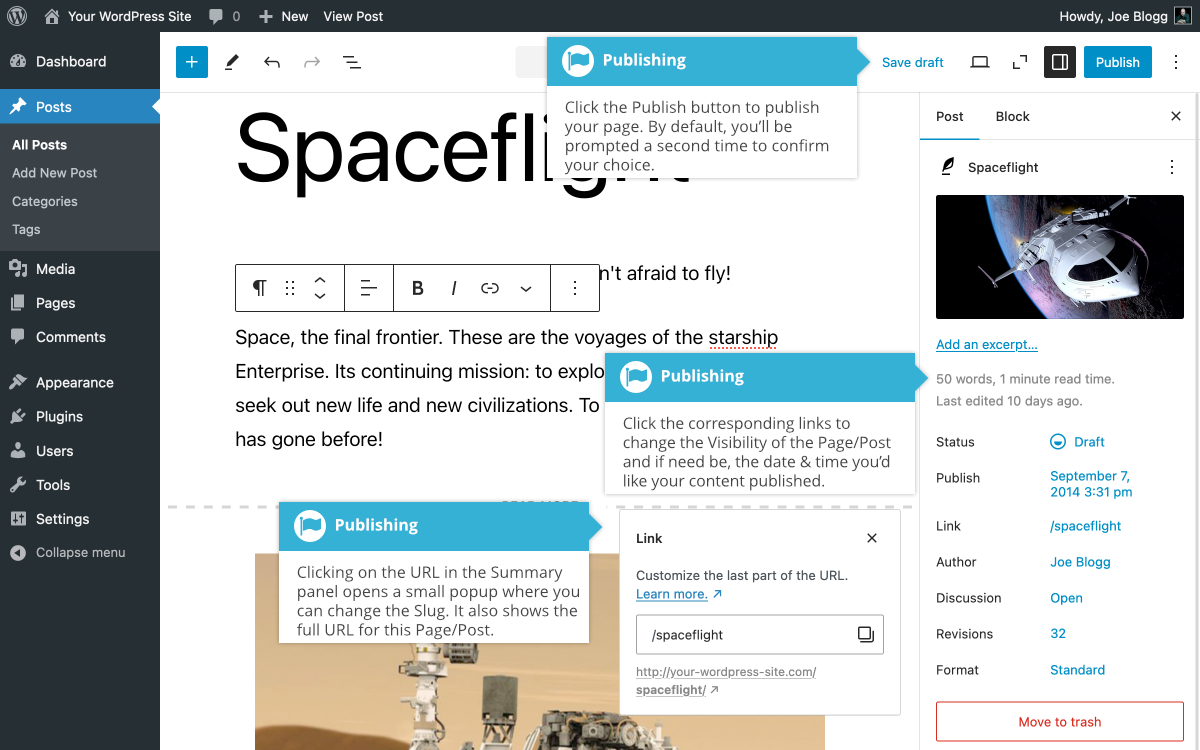
Within the Block Editor, publishing your content is a two-step process. After clicking the Publish button, you’re shown a new publish panel, confirming your selection, along with giving you another chance to update your contents visibility & publish date. Clicking the Publish button here will publish your Page/Post and make it live on your website.

If you want to turn off this extra pre-publish check, you can do so by unticking the checkbox on the bottom of this extra Publish panel. Once turned off, the Publish button will publish your content immediately, in the same way it did prior to WordPress 5.0. If you decide at a later time that you want to turn this pre-publish check back on, you can do so using the Options panel. This panel can be found by clicking the Preferences menu option under the Options icon in the top-right corner of the page (![]() ). Once the Options Panel displays, tick the Enable pre-publish checks checkbox to re-enable these pre-publish checks.
). Once the Options Panel displays, tick the Enable pre-publish checks checkbox to re-enable these pre-publish checks.